The following are kites built and flown by Anthony Thyssen. They are ordered generally by kite type.
Any and all comments are welcome, as is any queries on their construction, though you may like to look around his kite workshop before asking.
Anthony Thyssen, <A.Thyssen@griffith.edu.au>
Circoflex 12 meter
![[photo]](circo12.jpg)
|
This is a 12 meter (circumference) circoflex made from silver mylar but has
a ripstop leading edge to hold the spar. This allows the spar to be
removable in 8 feruled sections and the mylar body rolled up into a very
very small and compact bundle for transport. Just to show how big this circoflex is (4 meters across) here is a photo of Anthony holding the kite. More photos, hints, tips and construction notes are available in my Circoflex Information Page. This kite won 3rd place at the 21st Festival of Winds, 1998, at Bondi Beach, Sydney.
|
![[photo]](circo12_transport.jpg)
|
Mini-Circoflex
![[photo]](minicirco_quarters.jpg)
![[photo]](minicirco_red_strips.jpg)
![[photo]](minicirco_black_gold.jpg)
![[photo]](minicirco_blue_shade.jpg)
![[photo]](minicirco_green_gold.jpg)
![[photo]](minicirco_tri_color.jpg)
I started building lots of smaller mini-circoflexi as a special sale/give-away item. These smaller rings are about 1 to 1.5 meters diameter (3-5 meter circumference), and are made from ripstop in assorted colors and styles. The design is modified to that of the larger circoflexi (such as the one above), due the size and weight differences, and fly well in moderate winds (unlike the larger ring).
A Plan for Mini-Circoflexi is now available in the Kite Workshop.
Olympic Logo
![[photo]](olymring.jpg)
![[photo]](olymring_below.jpg) One evening thinking about mini-circoflexi variations, I had the bright idea
of linking multiple rings through each other. As the Olympic Games are
coming to the land down-under this was the result. Each ring is 4 meters
circumference, and logo itself is 4.1 meters across.
One evening thinking about mini-circoflexi variations, I had the bright idea
of linking multiple rings through each other. As the Olympic Games are
coming to the land down-under this was the result. Each ring is 4 meters
circumference, and logo itself is 4.1 meters across.
![[photo]](olympic2.jpg)
![[photo]](olympic.jpg) I made this for the Festival of the Winds in Sydney, September 1999. But
wouldn't know it, the big day came and I was down with a sever case of the
flu. Oh well thats life. Still its impressive.
I made this for the Festival of the Winds in Sydney, September 1999. But
wouldn't know it, the big day came and I was down with a sever case of the
flu. Oh well thats life. Still its impressive.
UFO (Rotor) Kite
![[photo]](ufo_8.jpg)
![[photo]](ufo_7.jpg) These UFO kites are flying extremely well and is made of colorful
ripstop nylon which is double sided taped to the fiber glass ovals and
then sewn together. The axle is then taped to the 'wing' oval of the
kite. The ripstop makes for a very colorful, though slightly heavier,
UFO.
These UFO kites are flying extremely well and is made of colorful
ripstop nylon which is double sided taped to the fiber glass ovals and
then sewn together. The axle is then taped to the 'wing' oval of the
kite. The ripstop makes for a very colorful, though slightly heavier,
UFO. ![[photo]](ufo_10.jpg)
![[photo]](ufo_10_flash.jpg) The UFO shown here is made from silvered mylar (aluminized polypropylene
sheeting). In sunlight the kite flashes like a beacon (see right) as it
spins in the sky making it visible at long range and is also highly
radar visible due to the aluminum coating.
The UFO shown here is made from silvered mylar (aluminized polypropylene
sheeting). In sunlight the kite flashes like a beacon (see right) as it
spins in the sky making it visible at long range and is also highly
radar visible due to the aluminum coating.
This particular version has some ripstop repair tape stuck on to the
kite, red & blue dots on one side, black strips on the other, so that
the pattern alternates as it spins.
More photos, hints, tips and construction notes are available in my Rotor and UFO Information web pages.
Spinning Jannys -- ''Jet Engines''
![[photo]](spinning_jannys.jpg) These two kites are essentially two long, single cell box kites, which are
spinning rapidally around a single bridle point. Each of the kites spin in
the direction of the arrow painted on the tyvek tube body, and both kites
fly from a fork on the one bridle line. The spin causes each kite to slew to
either side, so the two kites generally fly side-by-side.
These two kites are essentially two long, single cell box kites, which are
spinning rapidally around a single bridle point. Each of the kites spin in
the direction of the arrow painted on the tyvek tube body, and both kites
fly from a fork on the one bridle line. The spin causes each kite to slew to
either side, so the two kites generally fly side-by-side. The kites are called "Spinning Jannys" which are Patented. Like the UFO's above they are also a type of rotor kite, though they spin along a different axis to the UFO's.
Unfortunately this axis results in the kite twisting up the flying line. Because of this you need to attach a small flap to the kite line just below the kite to stop the twists proceeding any further. When that short length of line between the flap and the kite is twisted enough, the swivels will start working properly.
My nephew took one look at this kite flying and exclaimed... They look like Jet Engines :-)
Panflute Kite
![[photo]](panflute.jpg)
![[photo]](panflute_side.jpg) Flying here is what looks to be a sled kite made up using 7 windsocks all
joined together without spars. The kite is called a panflute and is one of
the easiest sewing kite projects I have yet to find. A great project for a
sewing club.
Flying here is what looks to be a sled kite made up using 7 windsocks all
joined together without spars. The kite is called a panflute and is one of
the easiest sewing kite projects I have yet to find. A great project for a
sewing club. The kite is built from 14 pieces (7 bottom, and 7 top panels) and only uses straight edges which makes sewing easy. 8 straight seams and 4 tags. Not only that but this kite was also built using a very soft unsealed ripstop from a fabric shop, and not proper sail cloth. You can look at the Panflute Revisited Kite Plan in the Kite Workshop.
Flies like a dream too, though not very high (30 to 40 degree line typical), but does so from the lightest of winds to extremely strong. It can however be difficult to launch in parks with a low or turbulent ground wind. Once up however it tends to stay put with a gentle side to side 'waggle'.
The kite looks like a flying mattress and I find I have to keep telling people that, it is NOT a "Six Pack". In fact it is much easier to build and flies better than a "Six Pack". If their was a progression of kites from a sled to a parafoil, this would fall just of the sled side, while a six-pack would fall more on the parafoil side.
![]()
Giant Panflute
![[photo]](panflute_giant.jpg) The above panflute has now been flying for 4 years now, with the pink color
panels fading, but still going strong. Then after finding myself flying in
VERY strong wings, that kite seemed to be the only one in my collection
which seemed to fly well, without roaming all over the sky. As such I
decided to go for a giant version of the panflute to handle wide wind
ranges, and attract people to the flying area. This is it.
The above panflute has now been flying for 4 years now, with the pink color
panels fading, but still going strong. Then after finding myself flying in
VERY strong wings, that kite seemed to be the only one in my collection
which seemed to fly well, without roaming all over the sky. As such I
decided to go for a giant version of the panflute to handle wide wind
ranges, and attract people to the flying area. This is it. To give you an idea of its size the kite itself is 2.5 meters long while the 'space ball' tails are 6 meters and 12 meters. Here is a photo of Anthony launching the kite. The kite flies great at a 30 to 40 degree line angle (typical of a panflute) with a side to side waggle, but not moving around the sky. The long tails swishing behind the kite has made many kite flyers say that it acts more like an octopus than a Peter Lynn Octopus does, though its shape isn't all that octopus-like.
![[photo]](panflute_giant2.jpg) I found however that you can't just scale a panflute up to this size. If you
do the kite collapses as all the air blows out the back of the kite. To keep
the internal air pressure, I needed to reduce the opening of the tubes at
the trailing edge. Also I added a couple of red 'fins' to the sides of the
kite. Though I don't think it was necessary, the small splash of red looks
great with the other colors.
I found however that you can't just scale a panflute up to this size. If you
do the kite collapses as all the air blows out the back of the kite. To keep
the internal air pressure, I needed to reduce the opening of the tubes at
the trailing edge. Also I added a couple of red 'fins' to the sides of the
kite. Though I don't think it was necessary, the small splash of red looks
great with the other colors.
The tails are known as 'space balls' and is basically a very long tapering windsock (blue) with a balls (white) inserted every so often. It is these tails which make the giant panflute so spectacular in the sky as the kite 'waggles' from side to side.
Genki Prototype -- Ol' Faithful
![[photo]](ol_faithful.jpg) This genki is one of the oldest kites in my collection. It
was the only one of a group of kites which were my first sewing attempts to
survive the test of time.
This genki is one of the oldest kites in my collection. It
was the only one of a group of kites which were my first sewing attempts to
survive the test of time. The kite was my first 'prototype', built at half size (1.5 meter across) from a Traditional Genki design I found on the internet. The material is a thick heavy nylon called 'shower proof', which was all I could get at the time. Its main spar is a well bowed (from use) 8mm pine dowel, while the rest of the frame is 3mm fiberglass rod.
![[photo]](ol_faithful2.jpg) After years of use this kite has taken a beating. It has
been flow in all wind ranges from a gentle sea breeze, though to near gale
force winds, been dropped into lakes and flown under water along the muddy
bottom, rained on, dragged though grass, trees, dirt, and sand, and once
even went surfing. Tuffy (not a bear) Koala and
huge numbers of lollies have been dropped from it, generally via thousands
of kite messenger trips up and down
the length of its line, for which it is still used. It has been tangled in
the bridles of a Peter Lynn giant octopus (owned by Peter Lynn himself),
wrapped and dragged around by other kites big and small, and had its line
snipped by a wandering rokakku. And it will probably be hit my more of the
above as time goes by.
After years of use this kite has taken a beating. It has
been flow in all wind ranges from a gentle sea breeze, though to near gale
force winds, been dropped into lakes and flown under water along the muddy
bottom, rained on, dragged though grass, trees, dirt, and sand, and once
even went surfing. Tuffy (not a bear) Koala and
huge numbers of lollies have been dropped from it, generally via thousands
of kite messenger trips up and down
the length of its line, for which it is still used. It has been tangled in
the bridles of a Peter Lynn giant octopus (owned by Peter Lynn himself),
wrapped and dragged around by other kites big and small, and had its line
snipped by a wandering rokakku. And it will probably be hit my more of the
above as time goes by.
After all this it still flies well, and with a turbo wind sock to steady it
against turbulence, it flies like it is glued to the sky, regardless of the
strength of the wind. I wish all my kites were as resilient as this tough
Red Genki
![[photo]](genki_red.jpg)
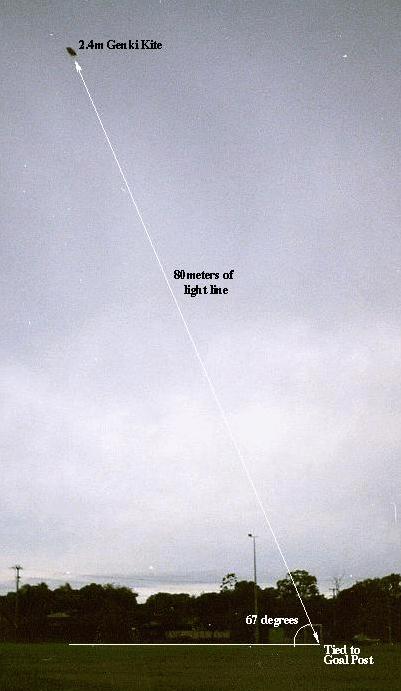
![[photo]](genki_so_high.jpg) This 2.4 meter, was made from 1/2 oz ripstop and a carbon fiber cross spar,
so that it was an ultra light kite for ultra light winds. That is think of
a wind you know is there but can't feel! Its bright red color makes this
kite visible for miles around.
This 2.4 meter, was made from 1/2 oz ripstop and a carbon fiber cross spar,
so that it was an ultra light kite for ultra light winds. That is think of
a wind you know is there but can't feel! Its bright red color makes this
kite visible for miles around. The lightness of the kite and its larger size (which is still smaller than the traditional plan of 3 meters!) makes the kite ideal for night flies. Equipped with 5 flashing red LEDs and shadowing the stars high over head makes for a relaxing fly.
A photo of a genki flying flying kite marked out
with angle measurements, shows just how efficient genkis are as a single
line kite. Here is another photo of Anthony
holding the kite, so you can get an idea of its actual size.
Australian Flag Genki
![[photo]](austflag_side.jpg)
![[photo]](austflag_gnd.jpg) After the success of the ultra light wind red genki above, and the retiring
of the first generation of appliqued flag genki before that. I needed a new,
better, larger, stronger, Australian Flag to fly whenever I feel patriotic.
This is the result, a 1.8 meter Genki which any true blue Aussie would love
to own.
After the success of the ultra light wind red genki above, and the retiring
of the first generation of appliqued flag genki before that. I needed a new,
better, larger, stronger, Australian Flag to fly whenever I feel patriotic.
This is the result, a 1.8 meter Genki which any true blue Aussie would love
to own. As a side note, the constitution star is displaced, and the Union jack is larger vertically. This change from a true Australian Flag is due to the kite 3:1 ratio and the diagonal corners. Other than that All the southern cross stars are correctly placed, and all stars are of the correct size with the right number of points (7, except the smallest, which has 5).
The applique is a little unusual however as I have placed white on top! This was the best practical way of handling the union jack. Also of note is the the applique continues into the hem of the kite. This was achieved by using a white edge, and then continuing the design onto the hem with permanent pen markers!!!
Hewitt Flexiwing
![[photo]](flexiwing.jpg)
![[photo]](flexiwing_side.jpg) This kite is similar to the genki but uses tapered carbon fiber fishing
pole tips to form a curved leading edge. This particular Hewitt Flexiwing
loves to zoom really high, over fly the zenith, and then go into a dive to
land just upwind of you! As such a drogue of some sort is recommended to slow
it down and give it a little drag.
This kite is similar to the genki but uses tapered carbon fiber fishing
pole tips to form a curved leading edge. This particular Hewitt Flexiwing
loves to zoom really high, over fly the zenith, and then go into a dive to
land just upwind of you! As such a drogue of some sort is recommended to slow
it down and give it a little drag. The Hewitt flexiwing is not a good kite as is. To fly well it really needs to be part of something larger which provides some extra sail area before the leading edge spar so as to pull the kite out of such dives. Live and learn.
Grabbing Australia Rokkakau
![[photo]](rok_grabau.jpg)
![[photo]](rok_grabau_side.jpg) My first Rokkakau kite, ''Grabbing Australia'' is a great flyer. In fact its 2
meter length means it really wants to break its line and fly off on its own,
(which it has done). The kite is painted Tyvek on a dowel frame, according to
a club plan by Tony Rice. Unfortunately its protruding dowel spars mean it is
easily tipped by other kite lines, making it not very good in Rok Battles.
My first Rokkakau kite, ''Grabbing Australia'' is a great flyer. In fact its 2
meter length means it really wants to break its line and fly off on its own,
(which it has done). The kite is painted Tyvek on a dowel frame, according to
a club plan by Tony Rice. Unfortunately its protruding dowel spars mean it is
easily tipped by other kite lines, making it not very good in Rok Battles.
Here is photo of Anthony standing next to the
rok.
![]()
Propellor Rokkakau
![[photo]](prop_rok.jpg) This small 45 cm rokakaku just did not seem to fly well at all, until I
added a 'propeller' (a spinning line laundry device) to the kite. Suddenly
the kite flies very well though noisily. The symbol is that of the
"Greatest American Hero", of the old TV series.
This small 45 cm rokakaku just did not seem to fly well at all, until I
added a 'propeller' (a spinning line laundry device) to the kite. Suddenly
the kite flies very well though noisily. The symbol is that of the
"Greatest American Hero", of the old TV series.
The kite was given away to a kid who was so eager I had to give him something.
Cody ''Man-Lifter'' Box Kite
![[photo]](cody_rear.jpg)
![[photo]](cody_side.jpg) Flying high above you is a huge 'bat' like box kite. The kite is about 2 1/2
meters from wing tip to wing tip! making this about half the size that Sir
Samulel Cody would have built, as a minimum. To give you an idea of the
kites size here is a photo of Anthony sitting under the
kite.
Flying high above you is a huge 'bat' like box kite. The kite is about 2 1/2
meters from wing tip to wing tip! making this about half the size that Sir
Samulel Cody would have built, as a minimum. To give you an idea of the
kites size here is a photo of Anthony sitting under the
kite. 
The kite was a celebration of my purchase of my first sewing machine (second hand for $50 and still in use) and was to be a 'small' kite. OK, 50cm sounded like a small length and the thing seemed to fit the material I had. But 50cm base adds up to a monster of a kite.
Tri-D (or Peter Lynn) Box kite
![[photo]](tri-d.jpg) A large (2 meters across, 1 meter long) pink and yellow box kite is flying
here. However this box kite instead of using square panels is using large
triangles, which is rather appropriate for a 3 dimensional kite. The kite line
is being pulled so tightly by this kite that the wind literally strums the
string.
A large (2 meters across, 1 meter long) pink and yellow box kite is flying
here. However this box kite instead of using square panels is using large
triangles, which is rather appropriate for a 3 dimensional kite. The kite line
is being pulled so tightly by this kite that the wind literally strums the
string.
![[photo]](tri-d_peter.jpg)
Anthony was lucky enough to meet the designer of this kite, Peter Lynn, and
as you see he put his own hand of approval on this Tri-D, much to Anthony's
delight. Also Peter explained a better bridle arrangement for these box
kites. A three legged bridle from the two front longeron ends and the third
to the rear lower cell point. The bridle should also be at least twice as
long as the kite. Many thanks Peter, the new bridle worked wonders.
![]()
Tri-D Mark 2
![[photo]](tri-d2.jpg) After Anthony's encounter with Peter Lynn, and his first Tri-D (see
above), he decided that he will build a slightly bigger (15%) version but
with the triangles built from two pieces so that the fabric is aligned with
the edges. This should prevent the kite material stretching along these
edges. The result is a 1.2 meter long by 2.4 meter wide tri-d with a hash
pattern of yellow and purple ripstop.
After Anthony's encounter with Peter Lynn, and his first Tri-D (see
above), he decided that he will build a slightly bigger (15%) version but
with the triangles built from two pieces so that the fabric is aligned with
the edges. This should prevent the kite material stretching along these
edges. The result is a 1.2 meter long by 2.4 meter wide tri-d with a hash
pattern of yellow and purple ripstop.
There is a good photo of Anthony checking the bridle
setting.
![]()
Tetralite (34 Cell)
![[photo]](tetra_34.jpg) This kite is the largest model detailed by the from plan... tetralite kite. This plan is
very simple, easily expanded through the various tetrahedral variations, and packs away like
an accordion for transport, it is available in either a book or CD-rom format.
This kite is the largest model detailed by the from plan... tetralite kite. This plan is
very simple, easily expanded through the various tetrahedral variations, and packs away like
an accordion for transport, it is available in either a book or CD-rom format.
![[photo]](tetra_34mag.jpg)
The tetrahedral is built using 30cm BBQ skewers, plastic tubing, and covered
with silver mylar gift-wrap. Very light, strong, and in sunlight, highly
visible. My only hate about it is the skewers break too easily, especially
as they become more brittle with age.
Eventually it was demolished due to lack of use, as just like all tetra's it is bulky and does take a lot of time to setup and take down.
16 Cell Tetrahedral
![[photo]](tetra_16cell.jpg)
![[photo]](tetra_16cell_rear.jpg) Two years after creating the Tetrahedral Kite
Plan, Anthony though it was time to build a larger 16 cell version.
Two years after creating the Tetrahedral Kite
Plan, Anthony though it was time to build a larger 16 cell version.
This is the result :- a 16 cell tetrahedral kite built with 3/4 oz ripstop
and 6mm dowel. The ripstop was cut so that the grain of the fabric falls
along the edges of the cells, which means 4 separate triangles of fabric was
needed for each cell. A total of 64 triangles and few weeks of Anthony's
free time to build. The kite collapses into flat diamonds of 4 cells each.
The kite after a lot of effort was never fully stable because of its weight. It was pulled apart and the cells were reused to create a new Tetra-TriD kite (below).
Tetra Tri-D Variation
![[photo]](ttd_top-rear.jpg) This kite is a cross between a tetrahedral box kite, and a Tri-D (or Peter
Lynn) Box kite. In fact it is braced in a similar way to a Tri-D Box reducing
overall weight of the kite from a typical tetra of that size.
This kite is a cross between a tetrahedral box kite, and a Tri-D (or Peter
Lynn) Box kite. In fact it is braced in a similar way to a Tri-D Box reducing
overall weight of the kite from a typical tetra of that size.
![[photo]](ttd_side.jpg)
![[photo]](ttd_rear.jpg)
The kite was built from the ripstop cells from my 16 cell tetra, which due to its weight, was never fully stable. This kite on the other hand is rock steady in the sky, flying all day on a light sea breeze, until the rear two cross spar dowels broke when the wind became very strong late afternoon.
Compared to other kites of this sort, this one has remained a favoriate, and is still regularly flown.
![]()
Tyvek 'Fire' Delta
![[photo]](delta_fire.jpg)
![[photo]](delta_fire_sunset.jpg) This is a first for me in many respects. It is my first delta kite, my first
kite made from tyvek, and the first kite I painted. The delta itself was
created from Delta
Plans by Dan Liegh, with a spine length of 75cm.
This is a first for me in many respects. It is my first delta kite, my first
kite made from tyvek, and the first kite I painted. The delta itself was
created from Delta
Plans by Dan Liegh, with a spine length of 75cm. However as this was my first delta, I did not build it quite right (live and learn). The cross spar does not solidly connect to the leading edges causing them to roll inward. The kite however flies well and stable.
The kite was given away to a fellow club member as a good will gesture, but was eventually lost out to sea.
![]()
Trefoil Delta, ''Eyes''
![[photo]](delta_eyes.jpg) Well it was some time after the not quite perfect delta above. But I decided
to try a different sort of delta from the "Kite Works" book. This is a
"Trefoil Delta" which has the spine down the front of the keel and a curved
keel-to-sail join. The idea is to give the sail the correct 3 dimensional
shape directly and use the spar to cleanly divide the wind.
Well it was some time after the not quite perfect delta above. But I decided
to try a different sort of delta from the "Kite Works" book. This is a
"Trefoil Delta" which has the spine down the front of the keel and a curved
keel-to-sail join. The idea is to give the sail the correct 3 dimensional
shape directly and use the spar to cleanly divide the wind.
Well, they were right. This kite flew so well, so high, so stable, and in a
field from which I have rarely been able to launch a kite and keep it up, a
backyard surrounded by tall trees. It was just a shame the art work turned
out so plain.
![]()
Giant Trefoil ''Butterfly'' Delta
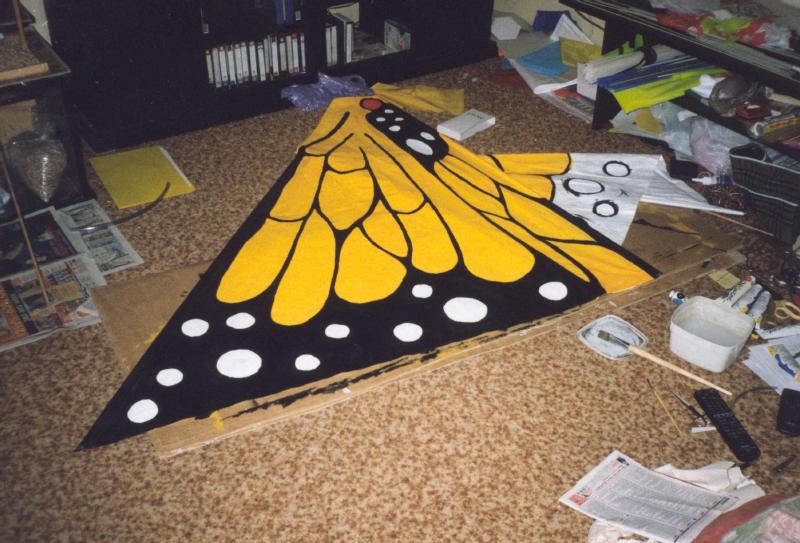
![[photo]](butterfly.jpg) With the huge success of the trefoil delta, the very next day I started on a
60% larger (3 times sail area) version. This kite was as large as I could
cut in one piece from the tyvek roll, and is 1.6 meters long, 3 meters wide.
With the huge success of the trefoil delta, the very next day I started on a
60% larger (3 times sail area) version. This kite was as large as I could
cut in one piece from the tyvek roll, and is 1.6 meters long, 3 meters wide.
Again it flew perfectly! So over the next few days I carefully painted the kite into a beautiful monarch butterfly pattern you can see.
The only problem I have encountered with trefoil deltas is that the nose tends
to get pushed in by the wind, as the material softens with age. The solution
was a removable length of plastic tubing, inserted across the nose to brace it
and keep it from collapsing. Later as the material softened further, this nose
collapse tended to equalize and the tubing was no longer required.
![]()
Pink Corner Kite
![[photo]](corner_pink.jpg) A corner kite is great fun to toss and jerk around when no wind is
available. I have even flown one indoors at a indoor fly-in :-). The kite
tumbles when the line is let out only to rise again when a carefully timed
pull on the kite line is performed. It can also be maneuvered like a Indian
fighter, though not as well.
A corner kite is great fun to toss and jerk around when no wind is
available. I have even flown one indoors at a indoor fly-in :-). The kite
tumbles when the line is let out only to rise again when a carefully timed
pull on the kite line is performed. It can also be maneuvered like a Indian
fighter, though not as well.
Kids can even play with this one when the wind is too turbulent or near
nonexistent. If the kite is placed on the ground with the leading point up
and downwind, the kite will just sit there until you pull on the line, at
which point it will leap into the air. With more carefully timed tugs on the
line, and then releasing, the kite will zoom and tumble around the sky, until
a ill-timed tug sends it zooming into the ground.
![]()
Tumble Star
![[photo]](tumble.jpg)
![[photo]](tumble2.jpg) This tumble star was one of my first experiments in color coordination with
kites. Previously kite were built with one color of material or just what
was handy.
This tumble star was one of my first experiments in color coordination with
kites. Previously kite were built with one color of material or just what
was handy.
![]()
Small Diamond Kites
![[photo]](../diamond/gecko.jpg) After finishing some experiments with a diamond kite train (which lost a
encounter with a rokakku), I converted each individual kite in the
train into separate individual diamond kites.
After finishing some experiments with a diamond kite train (which lost a
encounter with a rokakku), I converted each individual kite in the
train into separate individual diamond kites. 
The kites are each 40cm by 40cm, made from BBQ skewers and white plastic
kitchen tidy bag. and every kite in a batch is given some unique design,
the gecko motif, shown, being one of the best.
![[photo]](../diamond/smiley.jpg)
![[photo]](../diamond/little_girl.jpg) Later a El-cheapo Diamond Kite Plan was created and
over time expanded upon to become the most detailed kite plan (nearly book
size) on the internet. Note these kites are simple, very cheap to make, and
fly well in a light breeze. The plan is only large because of the number of
options available at each step.
Later a El-cheapo Diamond Kite Plan was created and
over time expanded upon to become the most detailed kite plan (nearly book
size) on the internet. Note these kites are simple, very cheap to make, and
fly well in a light breeze. The plan is only large because of the number of
options available at each step.
I usually have a box of these kite with me so I can let kids and small
children fly them. They are cheap enough that I am not particularly upset if
they 'escape' and end up in trees, or to give a few away to kid who have
been particularly inquisitive or helpful. If others like to keep the kite
Anthony only requests a small fee of a couple of dollars to cover costs of
building more of these nifty very light wind flyers.
![[photo]](../diamond/flying_group.jpg)
![[photo]](../diamond/designs2.jpg)
![[photo]](../diamond/dragon2.jpg)
Kite Arch
![[photo]](kitearch_early.jpg) A simple arch of ripstop diamond, forming the words ''Qld Kiteflyers Soc''.
Over time this expanded to a full title of ''Queensland Kiteflyers Society''.
A simple arch of ripstop diamond, forming the words ''Qld Kiteflyers Soc''.
Over time this expanded to a full title of ''Queensland Kiteflyers Society''.
Kite Ball
![[photo]](kiteball.jpg) This is my "ball" (completed May 2003), I call a Kite Ball, which is
very unusual. After a disappointment with my first ball (See Spiked Ball
below) I decided to get serious, and so I made a study of Polyhedra, and 3D geometry.
This is my "ball" (completed May 2003), I call a Kite Ball, which is
very unusual. After a disappointment with my first ball (See Spiked Ball
below) I decided to get serious, and so I made a study of Polyhedra, and 3D geometry.
![[photo]](kiteball_inside.jpg) During this study I discovered the mathematical object "Kite Hexacontrahedron", which is made using 60 kite shaped faces, all
exactly the same. The object was so suggestive I had to build it, and this is
that result. A 3.5 meter ball with a pattern of blue-green across the surface,
and 7 red kites with yellow tails, highlighting the mathematical pattern.
The ball however had its bridle lines ripped out of it at its first major
festival when the wind proved to strong for just about every kite flyer
attending. It was a valuable lesson about reinforcing the bridle lines so as
to distribute the forces around the surface of the ball. "Reinforce!
Reinforce! Reinforce!" is a big ball builders motto!
During this study I discovered the mathematical object "Kite Hexacontrahedron", which is made using 60 kite shaped faces, all
exactly the same. The object was so suggestive I had to build it, and this is
that result. A 3.5 meter ball with a pattern of blue-green across the surface,
and 7 red kites with yellow tails, highlighting the mathematical pattern.
The ball however had its bridle lines ripped out of it at its first major
festival when the wind proved to strong for just about every kite flyer
attending. It was a valuable lesson about reinforcing the bridle lines so as
to distribute the forces around the surface of the ball. "Reinforce!
Reinforce! Reinforce!" is a big ball builders motto!
![[photo]](ball_at_kirra_2011.jpg) The ball is very popular with kids, and unlike a puffer fish ball, it doesn't
have any spikes to grab on to. However I found that the short nose tunnel of
the puffer fish stops it deflating when it bounces, something this ball has
problems with. Because of this it is rare to get a good photo without a 'wind
dent' ruining the shape. Adding a tunnel however would ruin the artistic
effect however.
A better method to stop the bounce deflation would be to add a ripstop air
flow value (like the spiked ball below) but then I also need a rear zipper,
and even more reinforcement all over due to higher internal air pressure. But
this would make the ball 'hard' and not so 'kid friendly'. Live an Learn!
It is now 2011, and this ball is still a major player at local kite festivals
and charity events. Especially when I decide to go for 'walks' with it on
a 5 meter rope. Watch out for that big ball rolling your way!
The ball is very popular with kids, and unlike a puffer fish ball, it doesn't
have any spikes to grab on to. However I found that the short nose tunnel of
the puffer fish stops it deflating when it bounces, something this ball has
problems with. Because of this it is rare to get a good photo without a 'wind
dent' ruining the shape. Adding a tunnel however would ruin the artistic
effect however.
A better method to stop the bounce deflation would be to add a ripstop air
flow value (like the spiked ball below) but then I also need a rear zipper,
and even more reinforcement all over due to higher internal air pressure. But
this would make the ball 'hard' and not so 'kid friendly'. Live an Learn!
It is now 2011, and this ball is still a major player at local kite festivals
and charity events. Especially when I decide to go for 'walks' with it on
a 5 meter rope. Watch out for that big ball rolling your way!
Spiked Ball or Sea Urchin
![[photo]](spikeball.jpg) In April 1999, I decided I needed some "landing gear" or ground display items.
This spiked ball was the result. I wanted something different, and after
seeing a "great stellated dodecahedron" in a mathematics book, a 20 spiked
figure made from 60 triangles, this ball was born.
In April 1999, I decided I needed some "landing gear" or ground display items.
This spiked ball was the result. I wanted something different, and after
seeing a "great stellated dodecahedron" in a mathematics book, a 20 spiked
figure made from 60 triangles, this ball was born.
![[photo]](spikeball_side.jpg) One spike was removed and replaced with a mesh vent (with ripstop valve) and
the balls bridle (with a red tip, to suggest the 20th spike). A zipper was
added to the rear, which allows it to be easily deflated, also allows access
to the inside.
One spike was removed and replaced with a mesh vent (with ripstop valve) and
the balls bridle (with a red tip, to suggest the 20th spike). A zipper was
added to the rear, which allows it to be easily deflated, also allows access
to the inside.
![[photo]](spikeball_kids.jpg) As "landing gear" however this spiked ball is a disappointment. Because it is
composed of spikes, it generally sits collapsed on the ground like a jellyfish
out of water. It only inflates fully in a good strong wind. The spikes also
cushions the ball, stopping it bouncing around like most balls of this type.
As "landing gear" however this spiked ball is a disappointment. Because it is
composed of spikes, it generally sits collapsed on the ground like a jellyfish
out of water. It only inflates fully in a good strong wind. The spikes also
cushions the ball, stopping it bouncing around like most balls of this type.
As the wind picks up, and the internal pressure becomes great enough, it looks wonderful. Which presented anther problem. With 10 triangular panels all coming together at various points in the ball, it creates a weakness that requires special reinforcements, something that took 7 months to figure out and still fails to resolve.
Finally, it is not a ball suitable for kids. First the spikes make it far to easy to grab and held by the little monsters (no offence). Secondly, it is too small. To my shock, a kid took a flying leap from a sand dune onto the ball. Resulting in a huge increase in internal pressure (the air value preventing the air to escape), and blowing out one of those reinforced points.
All in all, this ball represents experience for myself, as a kite builder. And I definitely do NOT recommend ball made completely from spikes to other kite builders or fliers. Live and learn.
![]()
Beach Ball
![[photo]](ball.jpg) While visiting a annual kite workshop in Tathra (1999), far south NSW,
Australia, I cut out the pieces for and later completed the Beach Ball shown.
It is 1.2 meters in diameter, which means it isn't really very large. But it
is a great bouncer and very lively on the beach or in the park.
While visiting a annual kite workshop in Tathra (1999), far south NSW,
Australia, I cut out the pieces for and later completed the Beach Ball shown.
It is 1.2 meters in diameter, which means it isn't really very large. But it
is a great bouncer and very lively on the beach or in the park.
I usually hang the line from a little height, so that it floats more than it
bounces, stopping it from being handled too much by kids.
Tube Tails
![[photo]](tubes.jpg) After seeing the fantastic tails on Mark Newhaus's Kite Pages (now offline), I
mailed him and was rewarded with the design for two of the tail designs. A
long ''twist tube'', which slowly spins in the air, and the shorter ''screw
tube'' which spins rapidly. Good one Mark they look great.
After seeing the fantastic tails on Mark Newhaus's Kite Pages (now offline), I
mailed him and was rewarded with the design for two of the tail designs. A
long ''twist tube'', which slowly spins in the air, and the shorter ''screw
tube'' which spins rapidly. Good one Mark they look great.
The plan (courtesy of Mark) for the long Twisty Tube is now online in my workshop. The other tube pictured (screw
tube) I also have plans for, but it has a mistake in it somewhere, so has not
been properly published. Email me if you like its details.
![[photo]](twist_tube.jpg)
![[photo]](screw_tube.jpg)
Tuffy Koala
![[photo]](TK_descent3.jpg) Tuffy Koala while not a kite is part (err member) of my kite collection.
Tuffy Koala while not a kite is part (err member) of my kite collection.
![[photo]](TK_climb3.jpg) On a good day with a large field and decent ground winds, Tuffy will performs
dozens of parachute drops from a Kite Messenger or Ferry (see right), with the
local kids running after to retrieve him, so he can do it all again.
On a good day with a large field and decent ground winds, Tuffy will performs
dozens of parachute drops from a Kite Messenger or Ferry (see right), with the
local kids running after to retrieve him, so he can do it all again.
You can read about Tuffy's first parachute jump or look at the Messenger Plan in the kite workshop.